You need a chef workstation when you want to interact with the chef server, or any physical nodes (servers, network equipments, etc) in your infrastructure.
On a chef workstation, using several chef related commands (for example, knife), you can create cookbooks, or create recipes that will be executed on the individual nodes. You can also bootstarp a new node from chef workstation.
This tutorial explains how you can install and configure Chef workstation on a Linux server.
Download ChefDK
ChefDK stands for Chef Development Kit. ChefDK is available for almost all platforms including Debian Based Distros, Ubuntu, RedHat Based Distros like CentOS, Mac OS X, and Windows.The current stable version of ChefDK is 0.11.2, For RHEL based system, it is available for both version 6 and version 7 (i.e CentOS 6 and CentOS 7). The packaged RPM version is only available for 64-bit version.
Download, it from here, or use the direct URL as shown below.
For CentOS 7, use the following:
cd ~
wget https://packages.chef.io/stable/el/7/chefdk-0.11.2-1.el7.x86_64.rpm
For CentOS 6, use the following:
cd ~
wget https://packages.chef.io/stable/el/6/chefdk-0.11.2-1.el6.x86_64.rpm
Install ChefDK
Install the ChefDK using the RPM that we downloaded above.# rpm -ivh chefdk-0.11.2-1.el7.x86_64.rpm Preparing... ################################# [100%] Updating / installing... 1:chefdk-0.11.2-1.el7 ################################# [100%] Thank you for installing Chef Development Kit!This will install ChefDK under /opt/chefdk as shown below.
# ls -l /opt/chefdk/
drwxr-xr-x. 2 root root  4096 Mar  3 13:50 bin
drwxr-xr-x. 7 root root    62 Mar  3 13:50 embedded
-rw-r--r--. 1 root root 13249 Feb 22 14:26 version-manifest.json
-rw-r--r--. 1 root root  8233 Feb 22 14:26 version-manifest.txt
Verify ChefDK Installation
Execute chef verify, which will verify all different components that comes with ChefDK to make sure they all works properly without any issues as shown below.# chef verify Running verification for component 'berkshelf' Running verification for component 'test-kitchen' Running verification for component 'tk-policyfile-provisioner' Running verification for component 'chef-client' Running verification for component 'chef-dk' Running verification for component 'chef-provisioning' Running verification for component 'chefspec' Running verification for component 'generated-cookbooks-pass-chefspec' Running verification for component 'rubocop' Running verification for component 'fauxhai' Running verification for component 'knife-spork' Running verification for component 'kitchen-vagrant' Running verification for component 'package installation' Running verification for component 'openssl' Running verification for component 'inspec' ....... --------------------------------------------- Verification of component 'test-kitchen' succeeded. Verification of component 'chef-dk' succeeded. Verification of component 'chefspec' succeeded. Verification of component 'rubocop' succeeded. Verification of component 'knife-spork' succeeded. Verification of component 'openssl' succeeded. Verification of component 'berkshelf' succeeded. Verification of component 'chef-client' succeeded. Verification of component 'fauxhai' succeeded. Verification of component 'inspec' succeeded. Verification of component 'tk-policyfile-provisioner' succeeded. Verification of component 'kitchen-vagrant' succeeded. Verification of component 'chef-provisioning' succeeded. Verification of component 'package installation' succeeded. Verification of component 'generated-cookbooks-pass-chefspec' succeeded.The following is an example case, where the chef verify failed. Also, please note that ruby is required by Chef, which comes embedded within ChefDK.
# chef verify
..
/opt/chefdk/embedded/lib/ruby/gems/2.1.0/gems/mixlib-shellout-2.2.6/lib/mixlib/shellout.rb:289:in `invalid!': Expected process to exit with [0], but received '1' (Mixlib::ShellOut::ShellCommandFailed)
---- Begin output of /usr/bin/ohai -v ----
STDOUT:
STDERR: /opt/chefdk/embedded/lib/ruby/site_ruby/2.1.0/rubygems/dependency.rb:319:in `to_specs': Could not find 'chef-config' (= 12.8.0) - did find: [chef-config-12.7.2] (Gem::LoadError)
We are getting this error message: “Could not find ‘chef-config’ (= 12.8.0) – did find: [chef-config-12.7.2] (Gem::LoadError)”
In the above error message, the chef-config that came with the ChefDK was 12.7.2, which is an older version, which was not compatible in this setup. So, in this case, I installed the chef-config version 12.8.0 manually.
After that, when I ran the chef verify, it didn’t give the above error message.
Verify the ChefDK version
When you execute the chef –version command, it will show the version number of ChefDK and all the components that comes with it as shown below.# chef --version Chef Development Kit Version: 0.11.2 chef-client version: 12.7.2 berks version: 4.2.0 kitchen version: 1.5.0
Setup Chef ENV variables
You should also setup Chef related environment variables. For example: GEM_ROOT, GEM_HOME, GEM_PATH.export GEM_ROOT="/opt/chefdk/embedded/lib/ruby/gems/2.1.0" export GEM_HOME="/root/.chefdk/gem/ruby/2.1.0" export GEM_PATH="/root/.chefdk/gem/ruby/2.1.0:/opt/chefdk/embedded/lib/ruby/gems/2.1.0"Also, if you have ruby already installed on your system, you should update your PATH variable accordingly to use the ruby that comes with the chefDK as shown below.
export PATH="/opt/chefdk/bin:/root/.chefdk/gem/ruby/2.1.0/bin:/opt/chefdk/embedded/bin:/opt/chefdk/bin:/root/.chefdk/gem/ruby/2.1.0/bin:/opt/chefdk/embedded/bin:/opt/chefdk/bin:/root/.chefdk/gem/ruby/2.1.0/bin:/opt/chefdk/embedded/bin:/usr/local/sbin:/usr/local/bin:/usr/sbin:/usr/bin:/root/bin"The following command will show you all Chef environment variables that should be set.
chef shell-init bashThe quick way to set these environment variable is to add the above line to your .bash_profile file as shown below.
echo 'eval "$(chef shell-init bash)"' >> ~/.bash_profile
Firewalld Rules to Access Chef Manage
Next, you need to download the Chef starter kit from your Chef Server that is already running.To access your Chef Manage GUI, on the Chef Server, add the following firewalld rules to open-up the appropriate ports on the Chef server.
firewall-cmd --direct  --add-rule ipv4 \
filter INPUT_direct 0 -i eth0 -p tcp \
 --dport 443 -j ACCEPT

firewall-cmd --direct  --add-rule ipv4 \
filter INPUT_direct 0 -i eth0 -p tcp \
 --dport 80 -j ACCEPT

firewall-cmd --direct  --add-rule ipv4 \
filter INPUT_direct 0 -i eth0 -p tcp \
 --dport 9683 -j ACCEPT

firewall-cmd --reload
Download Starter Kit from Chef Manage GUI
Login to Chef Manage GUI, and click on “Administration” tab on the top. Next, select the organization from the list. In this example, the organization name is “example”. Once the organization is selected, click on “Starter Kit” from the menu on the left-side as shown below.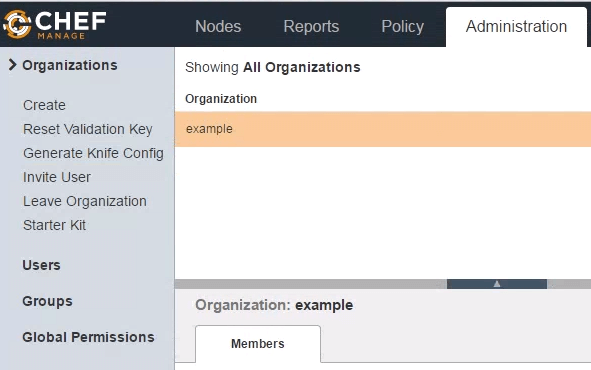
When you click on “Download”, you will get this warning message: Are you certain?: Your user and organization keys will be reset. Are you sure you want to do this?.
Click on Proceed. This will download chef-starter.zip file to your local machine.
Unzip Starter Kit
Transfer the chef-starter.zip file to the Chef workstation, and unzip it under root’s home directory as shown below.# cd ~ # unzip chef-starter.zip Archive: chef-starter.zip creating: chef-repo/cookbooks/ creating: chef-repo/cookbooks/starter/ creating: chef-repo/cookbooks/starter/templates/ creating: chef-repo/cookbooks/starter/templates/default/ inflating: chef-repo/cookbooks/starter/templates/default/sample.erb creating: chef-repo/cookbooks/starter/files/ creating: chef-repo/cookbooks/starter/files/default/ inflating: chef-repo/cookbooks/starter/files/default/sample.txt creating: chef-repo/cookbooks/starter/recipes/ inflating: chef-repo/cookbooks/starter/recipes/default.rb creating: chef-repo/cookbooks/starter/attributes/ inflating: chef-repo/cookbooks/starter/attributes/default.rb inflating: chef-repo/cookbooks/starter/metadata.rb inflating: chef-repo/cookbooks/chefignore inflating: chef-repo/README.md inflating: chef-repo/.gitignore creating: chef-repo/.chef/ creating: chef-repo/roles/ inflating: chef-repo/.chef/knife.rb inflating: chef-repo/roles/starter.rb inflating: chef-repo/.chef/ramesh.pem inflating: chef-repo/.chef/example-validator.pemIf you are manually setting up the chef-repo folder, then you need to create the above sub-directories manually, and copy the knife.rb file, organization-validator.pem file (for example: example-validator.pem), and username.pem file (for example: ramesh.pem) to the directories shown above.
Get the Chef Server SSL Certificate
At this stage, if you execute knife client list, you’ll get this error message as shown below: “ERROR: SSL Validation failure connecting to host certificate verify failed”# cd ~/chef-repo # knife client list ERROR: SSL Validation failure connecting to host: centos.example.com - SSL_connect returned=1 errno=0 state=error: certificate verify failed ERROR: Could not establish a secure connection to the server. Use `knife ssl check` to troubleshoot your SSL configuration. If your Chef Server uses a self-signed certificate, you can use `knife ssl fetch` to make knife trust the server's certificates. Original Exception: OpenSSL::SSL::SSLError: SSL Error connecting to https://centos.example.com/organizations/example/clients - SSL_connect returned=1 errno=0 state=error: certificate verify failedThe certificate verify failed, because we don’t have the SSL certificate downloaded from the Chef server yet.
For this, execute the following “knife ssl fetch” command as shown below.
# cd ~/chef-repo
# knife ssl fetch
WARNING: Certificates from centos.example.com will be fetched and placed in your trusted_cert
directory (/root/chef-repo/.chef/trusted_certs).

Knife has no means to verify these are the correct certificates. You should
verify the authenticity of these certificates after downloading.
This will download the certificate to the following truster_certs directory.
# ls -l /root/chef-repo/.chef/trusted_certs
-rw-r--r--. 1 root root 1379 Mar 20 20:17 centos_example_com.crt

# cat /root/chef-repo/.chef/trusted_certs/centos_example_com.crt
-----BEGIN CERTIFICATE-----
MIIDzDCCArSgAwIBAgIBADANBgkqhkiG9w0BAQsFADBRMQswCQYDVQQGEwJVUzEQ
MA4GA1UECgwHWW91Q29ycDETMBEGA1UECwwKT3BlcmF0aW9uczEbMBkGA1UEAwwS
ZXJhdGlvbnMxGzAZBgNVBAMMEmNlbnRvcy5leGFtcGxlLmNvbTCCASIwDQYJKoZI
..
..
WLyr2ORLMcck/OGsubabO/koMNTqhl2JJPECNiDJh06MeZ/2+BOwGZSpXDbw+vFE
NJAsLfsTzihGWZ58einMFA==
-----END CERTIFICATE-----
Final Verification of Chef Workstation
If the chef workstation is working propely, when you execute the “knife client list”, it will display all the clients that are connected to this workstation. Since we just installed it, we’ll see only the validator of your organization as shown below.# cd ~/chef-repo # knife client list example-validatorIf you execute this command on an existing chef workstation machine which already has several servers connected to it, you’ll see a list of all the servers that are managed by the chef.
In the following example, we see 5 servers connected to this chef workstation.
# knife client list
example-validator
node1
node2
node3
node4
node5
No comments:
Post a Comment