1. Executive Summary
If you have to transfer data, transfer only that which is necessary.
If you unavoidably have TBs to transfer regularly, consider having your
institution set up a GridFTP node.
If GridFTP is not available, and you’ve managed to add a Globus Online endpoint (no surprise), the fastest, easiest, user-mode, node-to-node method to move data for Linux and MacOSX is with bbcp.
An exception is for extremely large directory trees for which bbcp is
inefficient due to time required for building the directory tree. In
that case, rsync may be an easier choice, although bbcp offers a
named-pipe option which can use an external app to do the recursive
operation. lftp is a less sophisticated, but more widely available alternative to bbcp.
For first-time transfers of multi-GB directory trees containing 10,000s of files, the use of tar & netcat seems to be the fastest way to move the data.
If you use Windows, fdt is Java-based and will run there as well.
Note that bbcp and the similar bbftp can require considerable tuning to extract maximum bandwidth.
If these applications do not work at expected rates, ESNet’s
Guide to Bulk Data Transfer over a WAN is an
excellent summary of the deeper network issues. (Thanks to Rob Wells for the link change info.)
2. Big Bytes across the network
We all need to transfer data, and the amount
of that data is increasing as the world gets more digital. If it’s not
climate model data from the IPCC, it’s high energy particle physics data
from the LHC, or audio & video streams from a performance
recording.
The usual methods of transferring data (scp, http and ftp utilities (such as curl or wget)
work fine when your data is in the MB range, but when you have very
large collections of data there are some tricks that are worth
mentioning.
|
|
A note about transferring Zillions Of Tiny (ZOT) files
Altho much big data is showing up in very large files (10s or 1000s of GB each),
there is a lot of traffic in small files, often generated by naive users who are
creating many (10s of millions) such files in a single analytical run.
It’s worth a few words about the size and number of files. A file on a disk is
characterized not only by its contents but by the file descriptor itself. Each
file requires the lookup and examination of an inode structure to find out where
the disk blocks of that file are kept. Obviously if you have 1GB of data in 1
file, it will be accessible much more quickly than if you have to look up 1
million files of 1000 bytes each. This has implications when you’re
transferring data on an active system. You want to transfer the maximum data
with the minimum overhead, so if your files are large, it will transfer more
rapidly. Here’s an example.
A Mail dir on my laptop contains 95MB of information in 32,304 files and dirs.
It takes 12s to move to a remote server over 1GbE when being copied file by
file. It takes about 3s to store all the files and dirs in an uncompressed tar
file but then takes only 5s for the single file that contains all that data to
transfer to the same server over the same connection. This difference is
accentuated as the number of files increases and the network hop-count
increases.
The more data you can pack into fewer files, the faster your transfer will be.
Obviously if it’s a few files over a private, fast attached filesystem, it won’t
be significant, but when you’re moving ZOT files over a Wide Area Network or
even across networked filesystems, it can make a huge difference.
|
3. Compression & Encryption
Whether to compress and/or encrypt your data
in transit depends on the cost of doing so. For a modern desktop or
laptop computer, the CPU(s) are usually not doing much of anything so
the cost incurred in doing the compression/encryption is generally not
even noticed. However on an otherwise loaded machine, it can be
significant, so it depends on what has to be done at the same time.
Compression can reduce the amount of data that needs to be transmitted
considerably if the data is of a type that is compressible (text, XML,
uncompressed images and music), however progressively such data is
already compressed on the disk (in the form of jpeg or mp3 compression),
and compressing already compressed data yields little improvement.
Some compression utilities try to detect already-compressed data and
skip it, so there’s often no penalty in requesting compression, but some
utilities (like the popular Linux archiving tar) will not detect it
correctly and waste lots of time trying.
As an extreme example, here’s the timing of
making a tar archive of a large directory that consists of mostly
already compressed data, using compression or not.
Using compression:
$ time tar -czpf /bduc/data.tar.gz /data
tar: Removing leading `/' from member names

real    201m38.540s
user    95m32.114s
sys     7m13.807s

tar file = 84,284,016,900 bytes
NOT using compression:
$ time tar -cpf /bduc/data.tar /data
tar: Removing leading `/' from member names

real    127m13.404s
user    0m43.579s
sys     5m35.437s

tar file = 86,237,952,000
It took more than 74 minutes (about 58%)
longer using compression which gained us about 2GB less storage (2.3%
decrease in size.) YMMV.
|
|
Parallel compression/decompression
There are now parallel
compression/decompresion routines that will, for large files, help
substantially, by using all the available CPU cores to do the
compression.
From the same author as gzip comes pigz/unpigz
(probably already in your repository) that is a near-drop-in replacement for
gzip/gunzip. Similarly there is a parallel bzip2
engine called pbzip2 that is a near-drop-in replacement for bzip2. For very
large jobs there is also an MPI-capable bzip2
utility. The pigz compression accelerates on a per-file basis, so
compressing ZOT files will not give you much of a speedup, but if you pass large
files thru pigz, you’ll get close-to-perfect scaling.
|
Similarly, there is a computational cost to encrypting and decrypting a text,
but less so than with compression. scp uses ssh to do the underlying
encryption and it does a very good job, but like the other single-TCP-stream
utilities like curl and wget, it will only be able to push so much thru a
connection.
4. Avoiding data transfer
The most efficient way to transfer data is not
to transfer it at all. There are a number of utilities that can be
used to assist in NOT transferring data. Some of them are listed below.
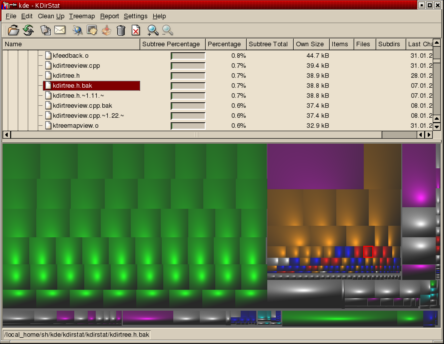
4.1. kdirstat
The elegant, open source kdirstat (and it’s
ports to MacOSX Disk Inventory X and Windows
Windirstat) are quick ways to visualize what’s taking
up space on your disk so you can either exclude the unwanted data that needs to
be copied or delete it to make more space. All of these are fully native GUI
applications that show disk space utilization by file type and directory
structure.
4.2. rsync
rsync, from the fertile mind of Andrew (samba) Tridgell, is an application that will synchronize 2 directory trees, transferring only blocks which are different.
The open source rsync is included by default
with almost all Linux and MacOSX distributions. Versions of rsync exist
for Windows as well, via Cygwin, DeltaCopy, and others.
|
|
rsync vs bbcp
bbcp can act similarly to rsync but will only checksum entire files,
not blocks, so for sub-GB transfers, rsync is probably a better choice in general.
For very large files or directory trees, bbcp may be a better choice due to its
multi-stream protocol and therefore better bandwidth utilization.
Note also that rsync is often used with ssh as the remote shell protocol. If
this is the case and you’re using it to transfer large amounts of data, note
that there is an old known ssh bug with the static flow control buffers that
cripples it for large data transfers. There is a well-maintained patch for
ssh that addresses this at the
High Performance SSH/SCP page.
This is well worth checking if you use rsync or scp for large transfers.
|
For example, if you had recently added some
songs to your 120 GB MP3 collection and you wanted to refresh the
collection to your backup machine, instead of sending the entire
collection over the network, rsync would detect and send only the new
songs.
For example, the first time rsync is used to transfer a directory tree, there will be no speedup.
$ rsync -av ~/FF moo:~
building file list ... done
FF/
FF/6vxd7_10_2.pdf
FF/Advanced_Networking_SDSC_Feb_1_minutes_HJM_fw.doc
FF/Amazon Logitech $30 MIR MX Revolution mouse.pdf
FF/Atbatt.com_receipt.gif
FF/BAG_bicycle_advisory_group.letter.doc
FF/BAG_bicycle_advisory_group.letter.odt
 ...

sent 355001628 bytes  received 10070 bytes  11270212.63 bytes/sec
total size is 354923169  speedup is 1.00
but a few minutes later after adding danish_wind_industry.html to the FF directory
$ rsync -av ~/FF moo:~
building file list ... done
FF/
FF/danish_wind_industry.html

sent 63294 bytes  received 48 bytes  126684.00 bytes/sec
total size is 354971578  speedup is 5604.05
So the synchronization has a speedup of 5600-fold relative to the initial transfer.
Even more efficiently, if you had a huge
database to back up and you had recently modified it so that most of the
bits were identical, rsync would send only the blocks that contained
the differences.
Here’s a modest example using a small binary database file:
$ rsync -av mlocate.db moo:~
building file list ... done
mlocate.db

sent 13580195 bytes  received 42 bytes  9053491.33 bytes/sec
total size is 13578416  speedup is 1.00
After the transfer, I update the database and rsync it again:
$ rsync -av mlocate.db moo:~
building file list ... done
mlocate.db

sent 632641 bytes  received 22182 bytes  1309646.00 bytes/sec
total size is 13614982  speedup is 20.79
There are many utilities based on rsync that
are used to synchronize data on 2 sides of a connection by only
transmitting the differences. The backup utility BackupPC is one.
parsync
can increase the speed of transfer by load-balancing and parallelizing
the transfer. Especially if there is an imbalance in the disk speed or
network, you can use parsync to optimize the transfer, while still
limiting the system load on the transmitting host and network.
|
|
File Partitioning Utilities
For this kind of load-balancing, 2 utilities should be noted:
|
4.2.1. More rsync examples
Command to rsync data from UCI’s HPC cluster to a remote backup server.
Where we will transfer the dir tacg-4.6.0-src to user happy’s account on the server circus.tent.uci.edu in the dir ~/HPC-backups. In the example below, we have to enter a password. In the 2nd example, we’ve set up passwordless ssh.
# first time:

$ rsync -av tacg-4.6.0-src happy@circus.tent.uci.edu:~/HPC-backups
happy@circus.tent.uci.edu's password: [xxxxxxxxxx]
X11 connection rejected because of wrong authentication.
Warning: untrusted X11 forwarding setup failed: xauth key data not generated
Warning: No xauth data; using fake authentication data for X11 forwarding.
sending incremental file list
tacg-4.6.0-src/
tacg-4.6.0-src/AUTHORS
tacg-4.6.0-src/COPYING
 ...
tacg-4.6.0-src/tacgi4/tacgi4.pl.in
tacg-4.6.0-src/test/
tacg-4.6.0-src/test/testtacg.pl
sent 2668172 bytes  received 1613 bytes  410736.15 bytes/sec
total size is 2662985  speedup is 1.00

# note the speedup = 1

# NB: the X11 warnings are just that - warnings that can be ignored
# second time:

$ rsync -av tacg-4.6.0-src happy@circus.tent.nac.uci.edu:~/HPC-backups
happy@circus.tent.nac.uci.edu's password: [xxxxxxxxxx]
X11 connection rejected because of wrong authentication.
Warning: untrusted X11 forwarding setup failed: xauth key data not generated
Warning: No xauth data; using fake authentication data for X11 forwarding.
sending incremental file list

sent 1376 bytes  received 18 bytes  398.29 bytes/sec
total size is 2662985  speedup is 1910.32

# note the speedup = 1910X 1st one.
4.2.2. As above but also to:
Command to:
-
compress files in transit (-z but see the note above about compression)
-
delete the local files when transferred (--remove-source-files)
-
perform the rsync in the background (&) (if you have ssh keys set up)
-
capture the activity in a log file
# the following 'touch' command freshens the date on all C source files in that dir
$ touch tacg-4.6.0-src/*.c

# generate a datestamp, so a second log doesn't overwrite the previous one
$ DD=`date +"%T_%F" | sed 's/:/./g'`

# !! VERY IMPORTANT !!  The following command DELETES ALL THE FILES in the local (HPC-side) dir tree
# (tho it does leave the tree structure behind).  If you don't want to delete the local files,
# don't include the option '--remove-source-files'

$ rsync -avz --remove-source-files tacg-4.6.0-src  happy@circus.tent.uci.edu:~/HPC-backups \
2> backup_logs/rsync_${DD}.log &

X11 connection rejected because of wrong authentication.
Warning: untrusted X11 forwarding setup failed: xauth key data not generated
Warning: No xauth data; using fake authentication data for X11 forwarding.
In the above example, there was no output to
the screen except the X11 errors (STDERR). All the STDOUT was captured
by the bash redirection command:
2> backup_logs/rsync_${DD}.log
so it now resides in the backup-logs file.
$ cat backup_logs/rsync_12.46.58_2014-04-08.log
sending incremental file list
tacg-4.6.0-src/Cutting.c
tacg-4.6.0-src/GelLadSumFrgSits.c
...
tacg-4.6.0-src/seqio.c
tacg-4.6.0-src/tacg.c

sent 1966 bytes  received 10232 bytes  2710.67 bytes/sec
total size is 2662985  speedup is 218.31
|
|
MacOSX
rsync is included with MacOSX as well but because of the Mac’s twisted history of using the using the AppleSingle/AppleDouble file format (remember those Resource fork problems?), the version of rsync (2.6.9) shipped with OSX versions up to Leopard will not handle older Mac-native files correctly. However, rsync version 3.x will apparently do the conversions correctly.
|
4.3. Unison
Unison is a slightly different take on transmitting only changes. It uses a bi-directional sync algorithm to unify
filesystems across a network. Native versions exist for Windows as
well as Linux/Unix and it is usually available from the standard Linux
repositories.
From a Ubuntu or Debian machine, to install it would require:
$ sudo apt-get install unison
5. Streaming Data Transfer
5.1. bbcp
bbcp seems to be a very similar utility to bbftp below, with the exception that it does not require a remote server running. In this behavior, it’s much more like scp
in that data transfer requires only user-executable copies (preferably
the same version) on both sides of the connection. Short of access to a
GridFTP site, bbcp appears to be the fastest, most convenient single-node method for transferring data.
|
|
bbcp does not encrypt the data stream
Unless you use an external encryption utility via bbcp’s named pipes option,
bbcp does not encrypt the data stream. It uses ssh to set up the authentication but not
to encrypt the data stream. You can use a utility like ccrypt
to encrypt/decrypt the network stream. Thanks to Dennis Yang for pointing this out.
|
The author, Andrew Hanushevsky has made a number of
precompiled binaries available as well as access to the bbcp git tree: git clone http://www.slac.stanford.edu/~abh/bbcp/bbcp.git
Somebody at Caltech has written up a very nice bbcp HOWTO.
The code compiled & installed easily with one manual intervention
curl http://www.slac.stanford.edu/~abh/bbcp/bbcp.tgz |tar -xzf -
cd bbcp
make

# edit Makefile to change line 18 to: LIBZ       =  /usr/lib/libz.a
make
# there is no *install* stanza in the distributed 'Makefile'
cp bin/your_arch/bbcp ~/bin   # if that's where you store your personal bins.
hash -r   # or 'rehash' if using cshrc
# bbcp now ready to use.
bbcp can act very much like scp for simple usage:
$ time bbcp  file.633M   user@remotehost.subnet.uci.edu:/high/perf/raid/file
real    0m9.023s
The file transferred in under 10s for a 633MB
file, giving >63MB/s on a Gb net. Note that this is over our very
fast internal campus backbone. That’s pretty good, but the transfer rate
is sensitive to a number of things and can be tuned considerably. If
you look at all the bbcp options, it’s obvious that bbcp was written to handle lots of exceptions.
If you increase the number of streams (-s) from the default 4 (as above), you can squeeze a bit more bandwidth from it as well:
$ bbcp -P 10 -w 2M -s 10 file.4.2G hjm@remotehost.subnet.uci.edu:/userdata/hjm/
bbcp: Creating /userdata/hjm/file.4.2G
bbcp: At 081210 12:48:18 copy 20% complete; 89998.2 KB/s
bbcp: At 081210 12:48:28 copy 41% complete; 89910.4 KB/s
bbcp: At 081210 12:48:38 copy 61% complete; 89802.5 KB/s
bbcp: At 081210 12:48:48 copy 80% complete; 88499.3 KB/s
bbcp: At 081210 12:48:58 copy 96% complete; 84571.9 KB/s
or almost 85MB/s for 4.2GB which is very good sustained transfer.
Even traversing the CENIC net from UCI to SDSC is fairly good:
$ time bbcp -P 2 -w 2M -s 10 file.633M   user@machine.sdsc.edu:~/test.file

bbcp: Source I/O buffers (61440K) > 25% of available free memory (200268K); copy may be slow
bbcp: Creating ./test.file
bbcp: At 081205 14:24:28 copy 3% complete; 23009.8 KB/s
bbcp: At 081205 14:24:30 copy 11% complete; 22767.8 KB/s
bbcp: At 081205 14:24:32 copy 20% complete; 25707.1 KB/s
bbcp: At 081205 14:24:34 copy 33% complete; 29374.4 KB/s
bbcp: At 081205 14:24:36 copy 41% complete; 28721.4 KB/s
bbcp: At 081205 14:24:38 copy 52% complete; 29320.0 KB/s
bbcp: At 081205 14:24:40 copy 61% complete; 29318.4 KB/s
bbcp: At 081205 14:24:42 copy 72% complete; 29824.6 KB/s
bbcp: At 081205 14:24:44 copy 81% complete; 29467.3 KB/s
bbcp: At 081205 14:24:46 copy 89% complete; 29225.5 KB/s
bbcp: At 081205 14:24:48 copy 96% complete; 28454.3 KB/s

real    0m26.965s
or almost 30MB/s.
When making the above test, I noticed the
disks to and from which the data was being written can have a large
effect on the transfer rate. If the data is not (or cannot be) cached
in RAM, the transfer will eventually require the data to be read from or
written to the disk. Depending on the storage system, this may slow
the eventual transfer if the disk I/O cannot keep up with the the
network. On the systems that I used in the example above, I saw this
effect when I transferred the data to the /home partition (on a slow IDE
disk - see below) rather than the higher performance RAID system that I
used above.
$ time bbcp -P 2  file.633M  user@remotehost.subnet.uci.edu:/home/user/nother.big.file
bbcp: Creating /home/user/nother.big.file
bbcp: At 081205 13:59:57 copy 19% complete; 76545.0 KB/s
bbcp: At 081205 13:59:59 copy 43% complete; 75107.7 KB/s
bbcp: At 081205 14:00:01 copy 58% complete; 64599.1 KB/s
bbcp: At 081205 14:00:03 copy 59% complete; 48997.5 KB/s
bbcp: At 081205 14:00:05 copy 61% complete; 39994.1 KB/s
bbcp: At 081205 14:00:07 copy 64% complete; 34459.0 KB/s
bbcp: At 081205 14:00:09 copy 66% complete; 30397.3 KB/s
bbcp: At 081205 14:00:11 copy 69% complete; 27536.1 KB/s
bbcp: At 081205 14:00:13 copy 71% complete; 25206.3 KB/s
bbcp: At 081205 14:00:15 copy 72% complete; 23011.2 KB/s
bbcp: At 081205 14:00:17 copy 74% complete; 21472.9 KB/s
bbcp: At 081205 14:00:19 copy 77% complete; 20206.7 KB/s
bbcp: At 081205 14:00:21 copy 79% complete; 19188.7 KB/s
bbcp: At 081205 14:00:23 copy 81% complete; 18376.6 KB/s
bbcp: At 081205 14:00:25 copy 83% complete; 17447.1 KB/s
bbcp: At 081205 14:00:27 copy 84% complete; 16572.5 KB/s
bbcp: At 081205 14:00:29 copy 86% complete; 15929.9 KB/s
bbcp: At 081205 14:00:31 copy 88% complete; 15449.6 KB/s
bbcp: At 081205 14:00:33 copy 91% complete; 15039.3 KB/s
bbcp: At 081205 14:00:35 copy 93% complete; 14616.6 KB/s
bbcp: At 081205 14:00:37 copy 95% complete; 14278.2 KB/s
bbcp: At 081205 14:00:39 copy 98% complete; 13982.9 KB/s

real    0m46.103s
You can see how the transfer rate decays as it approaches the write capacity of the /home disk.
bbcp can recursively copy directories with the -r flag. Like rsync,
it first has to build a file list to send to the receiver, but unlike
rsync, it doesn’t tell you that it’s doing that, so unless you use the -D
(debug) flag, it looks like it has just hung. The time required to
build the file list is of course proportional to the complexity of the
recursive directory scan. It can also do incremental copies like rsync with the -a -k flags, which also allow it to recover from failed transfers.
Note that bbcp is very slow at
copying deep directory trees of small files. If you need to copy such
trees, you should first tar up the trees and use bbcp to copy the
tarball. Such an approach will increase the transfer speed enormously.
The most recent version of bbcp can use the -N named pipes option to use external programs or pipes to feed the network stream. This allows you to specify an external program such as tar to provide the data stream for bbcp. Like this:
bbcp -P 2 -w 2M -s 10 -N io 'tar -cv -O /w2 ' remotehost:'tar -C /nffs/w2 -xf - '
The above command uses bbcp’s named pipe option for both input and output (-N io) to take tar’s output from STDOUT (tar’s -O
option), and using the abve-described options to stream the tar’s
output to bbcp to the remotehost where tar is invoked to decompose the
bytestream and write it to the new location (-C /nffs/w2)
NB: the original bbcp help page on this option has (as of May09,2013) a typo or 2. The above example is correct and works.
NB: I have ocassionally seen this error when using bbcp:
time bbcp -P 10 -w 2M -s 8 root@bduc-login.nacs.uci.edu:/home/testing.tar.gz .
bbcp: Accept timed out on port 5031
bbcp: Unable to allocate more than 0 of 8 data streams.
Killed by signal 15.
If you get this error, add the "-z" option to your command line (right after bbcp). ie"
time bbcp -z -P 10 -w 2M -s 8 root@bduc-login.nacs.uci.edu:/home/testing.tar.gz .
#  .......^^
5.2. bbftp
bbftp
is a modification of the FTP protocol that enables you to open multiple
simultaneous TCP streams to transfer data. It therefore allows you to
sometimes bypass per-TCP restrictions that result from badly configured
intervening machines.
In order to use it, you 'll need a bbftp
client and server. Most places that recieve large amounts of data
(SDSC, NCAR, other supercomputer centers, teragrid nodes) will already
have a bbftp server running, but you can also compile and run the server
yourself.
The more usual case is to run only the client. It builds very easily on Linux with just the typical curl/untar, cd, ./configure, make, make install dance:
$ curl http://doc.in2p3.fr/bbftp/dist/bbftp-client-3.2.0.tar.gz |tar -xzvf -
$ cd bbftp-client-3.2.0/bbftpc/
$ ./configure --prefix=/usr/local
$ make -j3
$ sudo make install
Using bbftp is more complicated than the usual ftp client because it has its own syntax:
To send data to a server:
$ bbftp -s -e 'put file.154M  /gpfs/mangalam/big.file' -u mangalam -p 10 -V tg-login1.sdsc.teragrid.org
Password:
>> COMMAND : put file.154M /gpfs/mangalam/big.file
<< OK
160923648 bytes send in 7.32 secs (2.15e+04 Kbytes/sec or 168 Mbits/s)


the arguments mean:
-s  use ssh encryption
-e  'local command'
-E  'remote command' (not used above, but often used to cd on the remote system)
-u  'user_login'
-p  # use # parallel TCP streams
-V  be verbose
The data was sent at 21MB/s to SDSC thru 10 parallel TCP streams (but well below the peak bandwidth of about 90MB/s on a Gb network)
To get data from a server:
$ bbftp -s -e 'get /gpfs/mangalam/big.file from.sdsc' -u mangalam -p 10 -V tg-login1.sdsc.teragrid.org
Password:
>> COMMAND : get /gpfs/mangalam/big.file from.sdsc
<< OK
160923648 bytes got in 3.46 secs (4.54e+04 Kbytes/sec or 354 Mbits/s)
I was able to get the data at 45MB/s, about half of the theoretical maximum.
As a comparison, because the remote reciever is running an old (2.4) kernel
which does not handle dynamic TCP window scaling, scp is only able to manage
2.2MB/s to this server:
$ scp  file.154M mangalam@tg-login1.sdsc.teragrid.org:/gpfs/mangalam/junk
Password:
file.154M                                  100%  153MB   2.2MB/s   01:10
5.3. lftp
lftp is a simple but capable FTP replacement that can use
multiple TCP streams
like bbcp, resulting in better performance than vanilla FTP or other single
stream mechanisms like scp.
One restriction is that the multi-stream approach only works in get mode,
so if you’re trying to upload data (put mode), it works only as well as a
single stream approach.
It will also do mirroring so if you’re trying to mirror an entire website or
file tree, it can do that, much like the wget -m -p <website_head>.
In my testing over a 1Gb connection, lftp was about 5%-10% slower than bbcp on getting
data (same number of streams with cache cleared each time) and noticeably slower on sending data.
Both bbcp and lftp appear to be transferring to local cache and on transferring files smaller than the free RAM,
will spend several seconds after the transfer is supposedly complete in syncing the data to disk.
#Getting a file over 4 streams
lftp -e 'pget -n 4 sftp://someone@host:/path/to/file'
5.4. Fast Data Transfer (fdt)
Fast Data Transfer
is an application for moving data quickly writ in Java so it can
theoretically run on any platform. The performance results on the web
page are very impressive, but in local tests, it was slower than bbcp
and the startup time for Java (as well as its failure to work in scp mode (couldn’t find the fdt.jar, even tho it was in the CLASSPATH, required you to explicitly start the receiving FDT server (not hard - see below, but another step)) argue somewhat against it.
Starting the server is easy; it starts by default in server mode:
java -jar ./fdt.jar
# usual Java verbosity omitted
The client uses the same jarfile but a different syntax:
java -jar ./fdt.jar -ss 1M -P 10 -c remotehost.domain.uci.edu  ~/file.633M  -d /userdata/hjm

# where
# -ss 1M  ..... sets the TCP SO_SND_BUFFER size to 1 MB
# -P 10 ....... uses 10 parallel streams (default is 1)
# -c host ..... defines the remote host
# -d dir ...... sets the remote dir
The speed is certainly impressive. Much more than scp:
# scp done over the same net, about the same time

$ scp file.4.2G  remotehost.domain.uci.edu:~
hjm@remotehost's password: ***********
 file.4.2G                   100% 4271MB  25.3MB/s   02:49
                                          ^^^^^^^^
# using the default 1 stream:
$ java -jar fdt.jar -c remotehost.domain.uci.edu ../file.4.2G -d /userdata/hjm/
(transferred in 86s for *53MB/s*)

# with 10 streams and a larger buffer:
$ java -jar fdt.jar -P 10 -bs 1M -c remotehost.domain.uci.edu ../file.4.2G -d /userdata/hjm/
(transferred in 68s for *66MB/s* with 10 streams)
But fdt is slower than bbcp. The following test was done at about the same time between the same hosts:
bbcp -P 10 -w 2M -s 10 file.4.2G hjm@remotehost.domain.uci.edu:/userdata/hjm/
bbcp: Creating /userdata/hjm/file.4.2G
bbcp: At 081210 12:48:18 copy 20% complete; 89998.2 KB/s
bbcp: At 081210 12:48:28 copy 41% complete; 89910.4 KB/s
bbcp: At 081210 12:48:38 copy 61% complete; 89802.5 KB/s
bbcp: At 081210 12:48:48 copy 80% complete; 88499.3 KB/s
bbcp: At 081210 12:48:58 copy 96% complete; 84571.9 KB/s
5.5. Globus Connect & Globus Connect MultiUser
This is a fairly new (mid-2011) approach that claims to provide easy access to GridFTP-like speeds, reliable transfers, and No IT required. (At this point sysadmins will break into muffled snorts, the same response as seamless provokes when applied to any computer-related activity.) Globus Connect and it’s more ambitious Globus Connect MultiUser
sibling is an attempt to make using the Globus mechanicals less
horrific for users. In this it largely succeeds from the users' POV -
those who are already part of a Globus/Grid node and who have specific
requirements to transfer TBs of data on a regular basis and who
have the endpoints set up for them. Otherwise it’s somewhat clunky
since you have to explicitly set up endpoints beforehand and too
complicated to set up unless you’re Linux-enhanced (ie. you do ssh
public key exchange, and globus MyProxy configs in your sleep, ).
That said, the process to install the software to your add yourself to the system is fairly straightforward. Just follow the instructions for the different platforms.
The problem with this approach is that it’s a large amount of work for a small amount of advantage relative to bbcp. However, the Multiuser
version allows all the users of a server or cluster to take advantage
of this protocol with no additional effort, a better tradeoff between
effort expended and advantages conferred.
The instructions for installing the Multiuser version are a little more elaborate. Herewith, their own devilish details for a sysadmin setting up the Globus Connect MultiUser (Linux-only so far).
5.6. GridFTP
If you and your colleagues have to transfer
data in the range of multiple GBs and you have to do it regularly, it’s
probably worth setting up a GridFTP
site. Because it allows multipoint, multi-stream TCP connections, it
can transfer data at multiple GB/s. However, it’s beyond the scope of
this simple doc to describe its setup and use, so if this sounds useful,
bother your local network guru/sysadmin.
5.7. Globus Online
Globus Online
is grid technology that has been wrapped in a web interface to enable
mere humans to use the capabilities of the GRIDFTP system to transfer
very large amounts of data very quickly between nodes that are part of
this system. The tagline is Move files fast No IT required. The advantages are that when it’s set up, it works very well. The disadvantages are that the No IT required part is at this point, fairly optimistic and that it will only work between registered sites (which you can add with the Globus Connect process, so it’s not very useful for ad hoc file transfers.
However, if you have a set of endpoints that
frequently need to transfer large amounts of data, this approach would
be very useful. Especially if you run a cluster or other multi-user
system, there is an associated utility called Globus Connect Multi-User which will allow all users of registered endpoint to use the Globus transfer capabilities.
While it is out of beta as of this writing
(June 10th, 2014), the setup is quite complex, oddly documented (lots of
it, information-sparse) and lacking simple examples so enabling it may
take some additional emails and even phone calls. An example is that
the documentation never defines authentication mechanisms and confuses domains and hostnames,
the distinction between which you would think an org like globus would
be clear. Possibly some of this confusion is sown by the use of globus
terminology, which is subtly different than that used by sysadmins (me).
I presume it will be getting progressively easier to use as time passes.
The process for setting it up on your
endpooint is described on the site, but it may be worthwhile describing
the general overview which can be confusing. UCLA’s IDRE also has a setup description (Thanks, Prakashan.)
Snarky Point of Contention: The documentation overuses the word seamlessly which all computer users realizes is a contraction for seamlessly if nothing goes wrong and your setup is exactly like mine and monkeys fly out my butt. YMMV.
Using the Globus Connect system requires you to:
-
Register a username with Globus Online.
This ID will be used to identify you to the Globus system. It is not
related to your username on any hosts you may want to use as endpoints.
-
Register connection endpoints that you will want to send to or receive from. You must of course have a user
account on these machines to use them and it helps if you have admin
privs on these machines to install the necessary software (see next
point). You will have to name your endpoints a combination of your
Globus ID and a machine name. It doesn’t have to be the hostname of the
client, but that will help to identify it later. You will also have to
generate a machine ID string that looks like d9g89270-74ab-4382-beb1-d2882628952a. This ID will have to be used to start the globusconnect process on the client before you can start a transfer. See the Linux section (for example) of the main page.
-
Install the necessary software
on the endpoint (client) machines. There are different packages for
different clients. You (or your sysadmin) must install the repository
info, and then the software itself. This is semi-automated via
platform-specific apps see the Globus Connect Downloads in the
link above. There are 60-plus packages that make up a Globus client;
thank god it’s done automatically. If you want to do it manually, the process for doing so is described here, but I’d recommend trying the automatic installation first.
-
Start the Globus Connect process on the client via the downloaded client software. On Linux, it is provided in the globusconnect-latest.tgz, which unpacks to provide both 32bit and 64bit clients, as well as the top-level bash script globusconnect to start the relevant version. Running globusconnect-X.x/globusconnect will enable the clients to see each other and now, finally you can…
-
Start a Data Transfer
by opening the previous link and identifying the nodes you want to
transfer between. After that, it’s as easy as using graphical FTP
client. Populate the panes with the directories you want to transfer
and click on the directional arrow to initiate the transfer.
I’ve gotten 40-50MB/s between UCI and the Broad Institute depending on time of day, system load, and phase of moon.
5.8. netcat
netcat (aka nc)
is installed by default on most Linux and MacOSX systems. It provides a
way of opening TCP or UDP network connections between nodes, acting as
an open pipe thru which you can send any data as fast as the connection
will allow, imposing no additional protocol load on the transfer.
Because of its widespread availability and it’s speed, it can be used to
transmit data between 2 points relatively quickly, especially if the
data doesn’t need to be encrypted or compressed (or if it already is).
However, to use netcat, you have to have login privs on both ends of the connection and you need to explicitly set up a listener
that waits for a connection request on a specific port from the
receiver. This is less convenient to do than simply initiating an scp or rsync
connection from one end, but may be worth the effort if the size of the
data transfer is very large. To monitor the transfer, you also have to
use something like pv (pipeviewer); netcat itself is quite laconic.
How it works: On one end (the sending end, in this case), you need to set up a listening port:
[send_host]: $ pv -pet honkin.big.file | nc -q 1 -l 1234 <enter>
This sends the honkin.big.file thru pv -pet
which will display progress, ETA, and time taken. The command will
hang, listening (-l) for a connection from the other end. The -q 1 option tells the sender to wait 1s after getting the EOF and then quit.
On the receiving end, you connect to the nc listener
[receive_host] $ nc sender.net.uci.edu 1234 |pv -b > honkin.big.file <enter>
(note: no -p to indicate port on the receiving side). The -b option to pv shows only bytes received.
Once the receive_host command is inititated,
the transfer starts, as can be seen by the pv output on the sending side
and the bytecount on the receiving side. When it finishes, both sides
terminate the connection 1s after getting the EOF.
This arrangement is slightly arcane, but
supports the unix tools philosophy which allows you to chain various
small tools together to perform a task. While the above example shows
the case for a single large file, it can also be modified only slightly
to do recursive transfers, using tar, shown here recursively copying the
local sge directory to the remote host.
5.8.1. tar and netcat
The combination of these 2 crusty relics from
the stone age of Unix are remarkably effective for moving data if you
don’t need encryption. Since they impose very little protocol overhead
to the data, the transfer can run at close to wire speed for large
files. Compression can be added with the tar options of -z (gzip) or '-j (bzip2).
The setup is not as trivial as rsync, scp, or bbcp,
since it requires commands to be issued at both ends of the connection,
but for large transfers, the speed payoff is non-trivial. For example,
using a single rsync on a 10Gb private connection, we were getting only
about 30MB/s, mostly because of many tiny files. Using tar/netcat, the
average speed went up to about 100MB/s. And using multiple tar/netcat
combinations to move specific subdirs, we were able to get an average of
500GB/hr, still not great (~14% of theoretical max), but about 5x
better than rsync alone.
Note that you can set up the listener on either side. In this example, I’ve set the listener to the receiving side.
In the following example, the receiver is 10.255.78.10; the sender is 10.255.78.2.
First start the listener waiting on port 12378, which will accept the byte-stream and untar it, decompressing as it comes in.
[receive_host] $ nc -l  -p  port_#  | tar -xzf -
#eg
               $ nc -l  -p  12378   | tar -xzf -

# when the command is issued, the prompt hangs, waiting for the sender to start
Then kick off the transfer on the sending side.
[send_host]: $ tar -czvf - dir_target   | nc -s  sender       receiver      port_#
# eg
             $ tar -czvf - fmri_classic | nc -s  10.255.78.2  10.255.78.10  12378
In this case, I’ve added the verbose flag (-v) to the tar command on the sender side so using pv
is redundant. It also uses tar’s built-in compression flag (-z) to
compress as it transmits. Depending on the bandwidth available to you
and the CPUs of the hosts, this may actually slow transmission. As noted above, it’s most effective on bandwidth-limited channels.
You could also bundle the 2 together in a script, using ssh to execute the remote command. etc, etc, etc, etc.
5.9. Aspera ascp
Aspera is a commercial company (recently
bought by IBM)whose aim is to monetize large scale data transfer across
networks. I have no experience with their Windows and Mac clients which
may be very good, but their default Linux client, starting about 3years ago
is not. Or to be more specific: It can work well, but it may well
require a lot of tweaking and adjustment to work well. God knows, I had
to. However, I was eventually able to transfer 15TB across the UC with the Linux client, which after the aforementioned wweaking worked ok.
Compared to the above-mentioned bbcp, or the consumer-skinned and smoothed Globus Online,
the Aspera Linux client is still crude, difficult to use, poorly
documented, and fails repeatedly. I posted some comments to the blog
linked above, but here are my suggestions about its use when you can’t
use an alternative approach.
When I say that the Linux client is poorly
documented, it doesn’t mean that there is no documentation. It means
that it is hard to find (no helpful links returned by the search service
on their support page), the Documentation (click ascp Usage) is no better than most free software, and that the Examples (click ascp General Examples)
are fairly sparse. Additionally, the customer support databases are
behind an firewall and are therefore beyond the reach of google. This is
certainly Aspera’s right, but it means self-help is essentially
impossible.
I will say that opening a support ticket
brought rapid (<1 hour from filing the ticket to a human response),
and knowledgeable assistance. (Thanks, Bill!). ascp will fill your
syslog with a ton of event logs which, if sent to Aspera, will probably
allow them to debug the problem.
A non-Aspera employee advised me to use ascp’s
parallel copy to speed up the transfer but that was apparently a
mistake since that option (tho it appears to work) is usually only
useful when the client node is CPU-bound (mine wasn’t) and neither
increases overall copy speeds, nor allows you to restart failed
transfers (and one of the parallel copies would fail every few minutes,
possibly due to the timing issue noted below.)
Since I was not able to get the parallel approach to work reliably for
more than 30 min at a time, the best approach was to start a single
serial process with the Linux ascp client after carefully reading the
above blog post and correcting the command as per your needs.
Also, ascp can be very sensitive to timing issues so a modification may have to be made to the configuration file:
cat /root/.aspera/connect/etc/aspera.conf     # the corrected version

<?xml version='1.0' encoding='UTF-8'?>
<CONF version="2">
  <default>
    <transfer>
      <protocol_options>
        <rtt_autocorrect>true</rtt_autocorrect>
      </protocol_options>
    </transfer>
    <file_system>
      <storage_rc>
        <adaptive>
          true
        </adaptive>
      </storage_rc>
    </file_system>
  </default>
</CONF>
So, once that issue was settled, and I stopped
trying to parallel copy, the following command worked reliably,
maintaining the copy for at least a couple of days until the transfer
finished. The transfer was not magically faster than what I would have
seen via bbcp, and was considerably slower than a GridFTP transfer, but
it did work.
/path/to/ascp -QT -l 500M -k1 user@remote.source.org:/remote/path /local/path
where:
-
-QT Q enables fair transfer policy, T DISables encryption.
-
-l 500m sets the target transfer rate at 500Mbits/s. This
depends on what your connection to the Internet allows and especially
what other operations are happening with the interface. ascp seems to
be very sensitive to this option and may well crash if it is exceeded.
-
-k1 enables resuming partially transferred files, where the options are (From docs:)
-
0: Always retransfer the entire file.
-
1: Check file attributes and resume if the current and original
attributes match. (This is probably good enough for most ppl and is MUCH
faster than -k2)
-
2: Check file attributes and do a sparse file checksum; resume if the current and original attributes/checksums match.
-
3: Check file attributes and do a full file checksum; resume if the current and original attributes/checksums match.
-
0: Always retransfer the entire file.
Again, read the docs carefully since the error messages are unhelpful.
6. Latest version of this Document
The latest version of this document should always be here.


