Friday, March 30, 2018

Two-Node Setup of a Private Ethereum on AWS with Contract Deployment (Part 1)

From time to time I plan to emulate an Ethereum environment. The idea behind is to observe how Ethereum nodes work to each other, and how different accounts interact in transaction and contract deployment. For testing, most contract deployment example nowadays is mainly on testrpc or testnet, but how the contract works among nodes is still new to me.
I deploy this two-node setup on AWS. As I do not use any special features on AWS, it should be applicable to another cloud environment.
My setup is inspired by the work from JJ’s World (link), and after testing this for several times with modification, I document the whole process I have done, and share some experience here about the whole process.
I also use the Voting contract developed by Mahesh Murthy (link). This is a simple contract that best illustrates how a contract works in the chain.
This by no means is a detailed step-by-step guide. I omit certain steps and make reference to some work done by others. For example, the detailed operation of AWS EC2, including launching a new instance with a setup like access key, security group, etc. can be found here (link).


There are two parts in this setup.
Part 1: Create a 2-node Ethereum network with private blockchain, and accounts on the two nodes can send ether to each other.
Part 2: Deploy a contract from one node, and both accounts can access and execute functions on this contract.

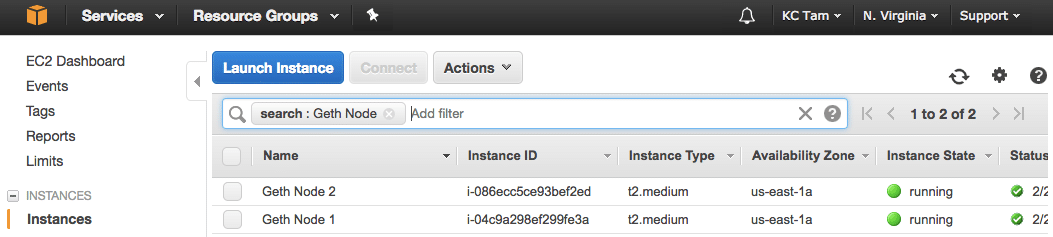
Step 1: Launch two EC2 instances.


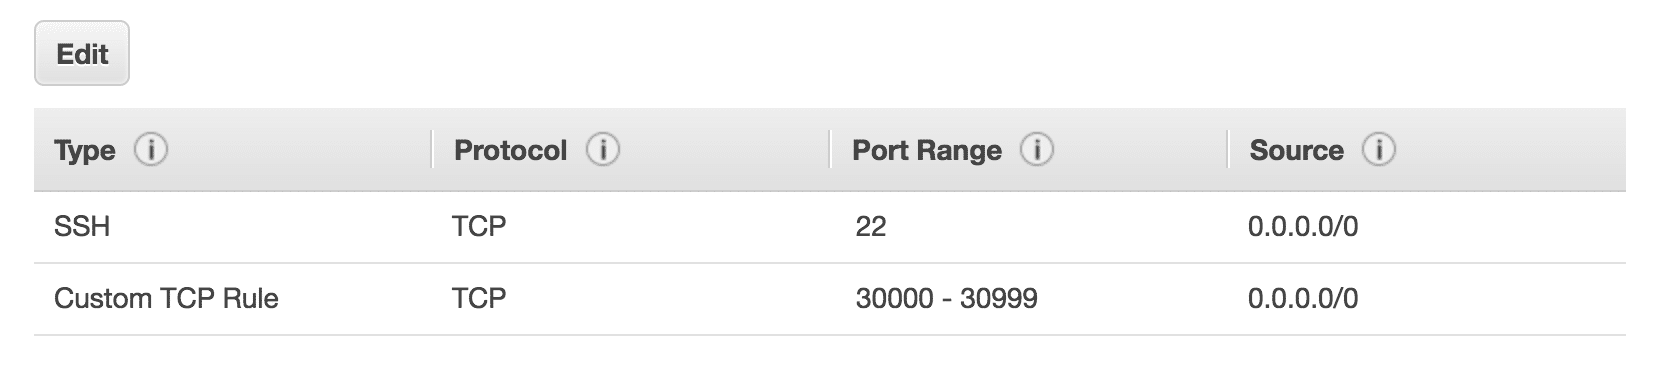
Use t2.medium (2 vCPU, 4 GB RAM) with default 8G SSD. Pick Ubuntu OS. Make sure that the two nodes are with the same security group, which allows TCP 30303 (or 30000-30999 as I may use more ports on this range). Port 30303 by default is for peering among nodes.


Experience Sharing
  • I first tried t2.micro as it is the free-tier offer. However, mining was not successful (“DAG” loop without ether reward). I next tried t2.small and mining worked. However, when I deployed contract (see Part 2), the rpc was unstable. Finally, I found t2.medium good enough for my setup.

  • I usually STOP the instance after testing (to save money). Please note that the public IP address of the EC2 instance will be changed after you START it back. This does not have an impact on our setup here as I am using the private IP address of these instances for peering. Private IP address remains even after I STOP/START the instance. In any case if Public IP address is needed, the peering still works, but you may need to change the peering address every time.

Step 2: Install geth client on Node 1


Access to Node 1 with ssh and proper key. Follow the recommended process (link) for geth installation. Install from PPA is good enough.
Node 1 

$ sudo apt-get install software-properties-common
$ sudo add-apt-repository -y ppa:ethereum/ethereum
$ sudo apt-get update
$ sudo apt-get install ethereum

and verify it with $ which geth and you will see that geth is installed properly.

Step 3: Prepare the Genesis.json

This same Genesis.json is applied to both nodes, as it is to ensure both nodes having the same genesis block. Here is the Genesis.json I used, which is adopted from here (link). I take out the initial allocation as I don’t need to modify the address on this file in each new setup. Each account will gain some ethers once it starts mining.

Genesis.json
{

"config": {

"chainId": 15,

"homesteadBlock": 0,

"eip155Block": 0,

"eip158Block": 0

},

"nonce": "0x0000000000000042",

"mixhash": "0x0000000000000000000000000000000000000000000000000000000000000000",

"difficulty": "0x200",

"alloc": {},

"coinbase": "0x0000000000000000000000000000000000000000",

"timestamp": "0x00",

"parentHash": "0x0000000000000000000000000000000000000000000000000000000000000000",

"gasLimit": "0xffffffff",

"alloc": {

}

}

Keep this file somewhere and later scp to the nodes, or just copy and paste with an editor on both nodes.

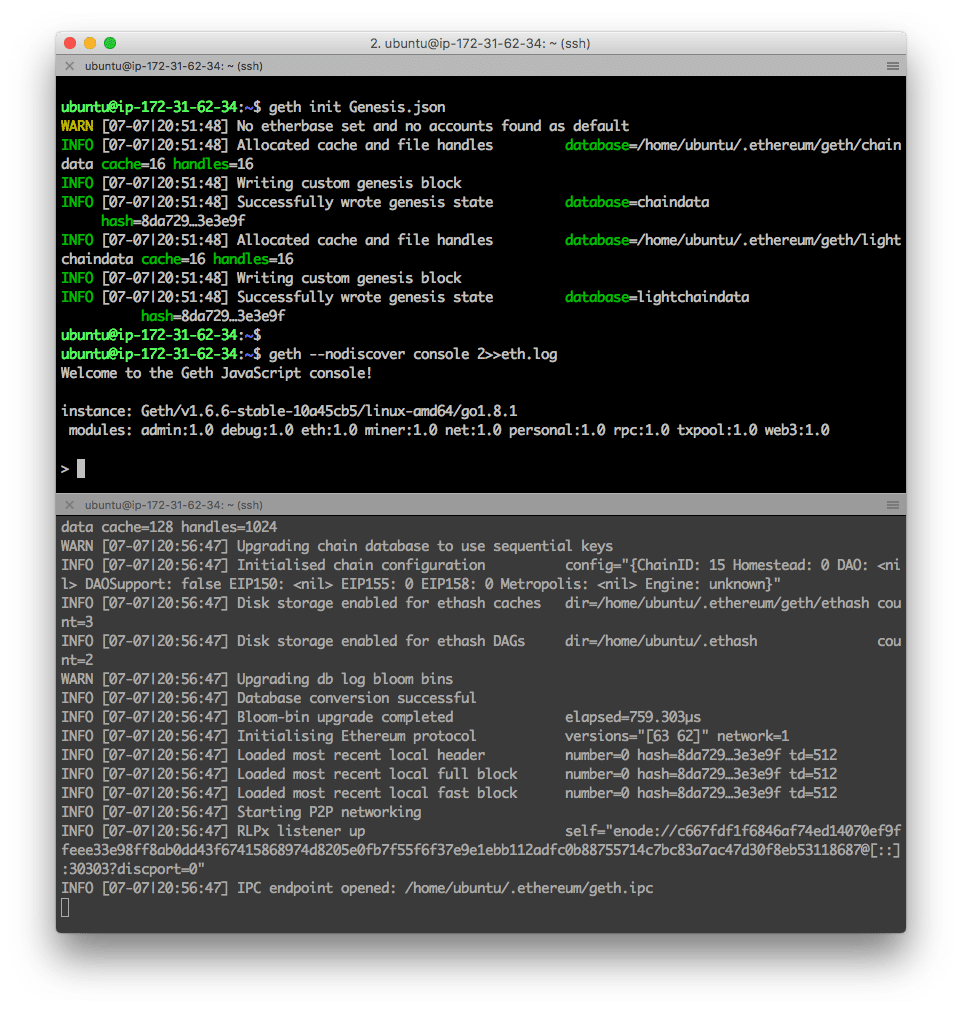
Step 4: Init the geth with Genesis.json


Node 1 

$ geth init Genesis.json

Step 5: Launch geth now

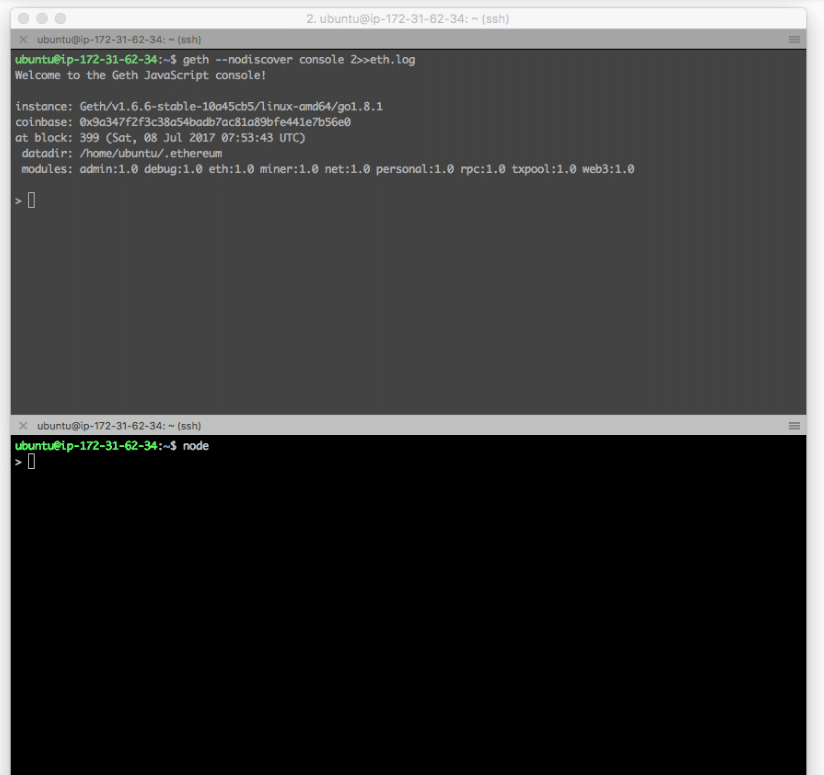
It is good practice to have two screens in parallel (or a split terminal). One screen is the console while another shows the log. Open a new terminal and ssh to Node 1, and keep reading the log.
Node 1 $ geth --nodiscover console 2>> eth.log
another terminal $ tail -F eth.log
Two-Node Setup of a Private Ethereum on AWS with Contract Deployment
Experience Sharing
  • In many examples, it is recommended to use –datadir to specify the directory for private ethereum blockchain. This is good practice when you are interacting with different chains. My example is an isolated environment. Therefore I omit this option, and my private chain is stored in the directory ~/.ethereum/.

Step 6: Create an Account on Node 1

Node 1 geth
 
> personal.newAccount()

> eth.getBalance(eth.accounts[0]) OR > web3.fromWei(eth.getBalance(eth.accounts[0]), ether)

Now we have an account on this node (always check it with > eth.accounts[0] or > eth.coinbase). And currently, there is no ether in the account balance as we have not allocated any in Genesis.json.

Step 7: Start Mining

We can begin mining process.
  1. From the log terminal, we will see “Generating DAG in progress” and after an epoch, a block is being mined.
  2. Once a block is mined, 5 ethers are added to the account balance. This is a good indicator whether mining is successful or not.
  3. If we keep mining, the amount of account balance keeps increasing as more new blocks are mined.

Node 1 geth 

> miner.start()
> eth.getBalance(eth.accounts[0])

Feel free to keep mining, or we can turn it off by > miner.stop().
Now Node 1 is ready. Let’s work on Node 2.

Step 8: Repeat Step 2-6 on Node 2


Make sure the same Genesis.json is used when init the blockchain on Node 2.
Do not start mining as we want Node 2 on the same blockchain as Node 1 (through Peering).

Step 9: Peering

Now we begin peering the two nodes. There are several ways to peer. Here I am using “admin addPeer” to do the peering: in Node 2, add Node 1 enode information for peering.
First, check both nodes that there is no peering.
Node 1 > admin.peers
Node 2 > admin.peers

Obtain enode information from Node 1
Node 1 > admin.nodeInfo.enode

We will get something like this:
"enode://c667fdf1f6846af74ed14070ef9ffeee33e98ff8ab0dd43f67415868974d8205e0fb7f55f6f37e9e1ebb112adfc0b88755714c7bc83a7ac47d30f8eb53118687@[::]:30303?discport=0"

Add this information to Node 2. Change the [::] with the Private Address of Node 1.
Node 2 

> admin.addPeer("enode://c667fdf1f6846af74ed14070ef9ffeee33e98ff8ab0dd43f67415868974d8205e0fb7f55f6f37e9e1ebb112adfc0b88755714c7bc83a7ac47d30f8eb53118687@172.31.62.34:30303?discport=0")

After that check, both nodes and they are peering each other.
Node 1 > admin.peers
Node 2 > admin.peers

The left-hand-side is Node 1 and right-hand-side is Node 2. Note that after > addPeer() on Node 2, two nodes are peered. We do not need to do the same thing on Node 1.

Also, from the log, we see that, after peering, we see “Block synchronization started” and “Imported new chain segment” on Node 2 log (bottom-right terminal).

Experience Sharing
  • Make sure to use the same Genesis.json to initiate the blockchain. In one trial I forgot to init step and peering was unsuccessful.
  • AWS EC2 instance comes with a private IP address and a public IP address. Both works fine in add peering, but using private IP address is more convenient as it is not changed after instance STOP/START.

Step 10: Send Ethers Between Accounts


As both nodes are in the same Ethereum blockchain, we will send some ethers between the accounts. In this example, 10 ethers are sent from the account of Node 1 to account of Node 2. This is one of the best ways to verify if the setup is successful.

Node 1 

> web3.fromWei(eth.getBalance(eth.coinbase), ether)
> personal.unlockAccount(eth.coinbase)
> eth.sendTransaction({from: eth.coinbase, to: "0xabc65de992289401dcff3a70d4fcfe643f7d2271", value: web3.toWei(10, ether)})
> miner.start()

Node 2 > web3.fromWei(eth.getBalance(eth.coinbase), ether)

Two-Node Setup of a Private Ethereum on AWS with Contract Deployment
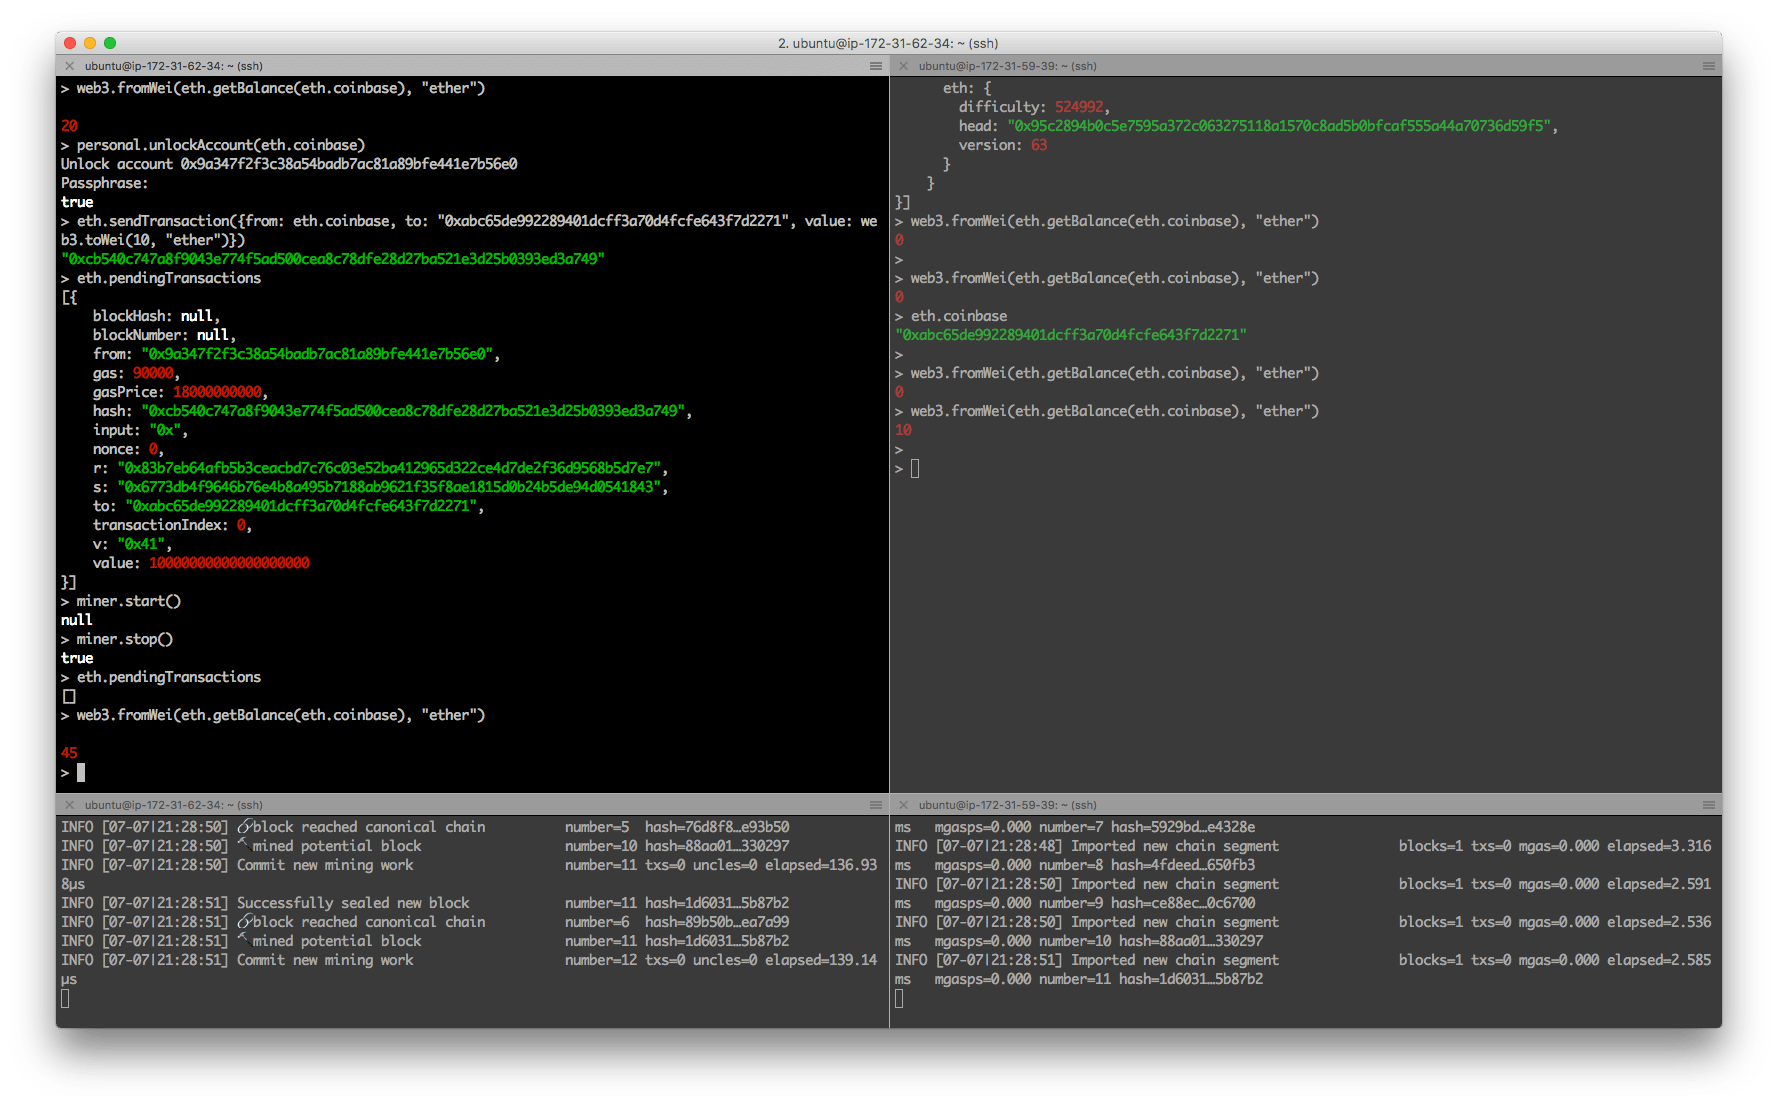
Note that we see “pending transaction” as this transaction is not mined yet. Once we start mining in Node 1, the transaction is done and account balance on Node 2 is now 10 ethers.

And we see 45 ethers in Node 1 (not the expected 20-10=10 ethers). It is because Node 1 keeps receiving mining reward (5 ethers per block). The balance will keep increasing until we stop mining.

Closing

Now we complete the first part: we build a two-node private Ethereum blockchain on AWS. You can go directly to next part to deploy contract, r stop the process and EC2 instance for future use. In case peering is changed for any reasons, you can re-peering the nodes with Step 9 above.

Two-Node Setup of a Private Ethereum on AWS with Contract Deployment (Part 2)

Recap

In Part 1, we have completed a setup of two-node private Ethereum blockchain. Now we deploy a contract on this blockchain, and the accounts of both nodes can access the contract and execute the functions.
My plan is to deploy the contract on Node 1 and see how Node 2 accesses this contract.
The contract I am using is the “Voting.sol” by Mahesh Murthy in his blog (link). He wrote a very comprehensive guide about Ethereum application. While he deployed the application on testrpc, I plan to deploy the same contract on my private blockchain with the same deployment example. You can easily cross-check the deployment procedure.
Since he has explained in very detail how the code compilation works, I will skip the detail and only refer to some points relevant to my contract deployment. Please refer to his Part 1 (link) on the detail about the code and the compilation.

The Code “Voting.sol”

Voting.sol (source: link)
pragma solidity ^0.4.11;
// We have to specify what version of compiler this code will compile with

contract Voting {
  /* mapping field below is equivalent to an associative array or hash.
  The key of the mapping is candidate name stored as type bytes32 and value is
  an unsigned integer to store the vote count
  */
  
  mapping (bytes32 => uint8) public votesReceived;
  
  /* Solidity doesn't let you pass in an array of strings in the constructor (yet).
  We will use an array of bytes32 instead to store the list of candidates
  */
  
  bytes32[] public candidateList;

  /* This is the constructor which will be called once when you
  deploy the contract to the blockchain. When we deploy the contract,
  we will pass an array of candidates who will be contesting in the election
  */
  function Voting(bytes32[] candidateNames) {
    candidateList = candidateNames;
  }

  // This function returns the total votes a candidate has received so far
  function totalVotesFor(bytes32 candidate) returns (uint8) {
    if (validCandidate(candidate) == false) throw;
    return votesReceived[candidate];
  }

  // This function increments the vote count for the specified candidate. This
  // is equivalent to casting a vote
  function voteForCandidate(bytes32 candidate) {
    if (validCandidate(candidate) == false) throw;
    votesReceived[candidate] += 1;
  }

  function validCandidate(bytes32 candidate) returns (bool) {
    for(uint i = 0; i < candidateList.length; i++) {
      if (candidateList[i] == candidate) {
        return true;
      }
    }
    return false;
  }
}
d!'

This is a simple contract to illustrate how Solidity code works. Here are some points we will refer to in this part.
  1. The contract requires a list of candidates (see the constructor). We will input this when deploying a new contract.
  2. Two functions are defined in this contract: total Voting For and vote For Candidate. We will use these two functions to interact with the contract from both nodes.

You can find the detail process of compilation (using solc) here. After compilation, we need two pieces of information for contract deployment. They are the Application Binary Interface (ABI) and Bytecode.

Application Binary Interface (ABI)


It contains the methods available in this contract that users can interact with. Here is the ABI for this Voting contract.

'[{"constant":false,"inputs":[{"name":"candidate","type":"bytes32"}],"name":"totalVotesFor","outputs":[{"name":"","type":"uint8"}],"payable":false,"type":"function"},{"constant":false,"inputs":[{"name":"candidate","type":"bytes32"}],"name":"validCandidate","outputs":[{"name":"","type":"bool"}],"payable":false,"type":"function"},{"constant":true,"inputs":[{"name":"","type":"bytes32"}],"name":"votesReceived","outputs":[{"name":"","type":"uint8"}],"payable":false,"type":"function"},{"constant":true,"inputs":[{"name":"","type":"uint256"}],"name":"candidateList","outputs":[{"name":"","type":"bytes32"}],"payable":false,"type":"function"},{"constant":false,"inputs":[{"name":"candidate","type":"bytes32"}],"name":"voteForCandidate","outputs":[],"payable":false,"type":"function"},{"inputs":[{"name":"candidateNames","type":"bytes32[]"}],"payable":false,"type":"constructor"}]'

Bytecode

It is the actual contract code to be deployed on the blockchain. Here is the bytecode.
'0x6060604052341561000c57fe5b6040516103d83803806103d8833981016040528080518201919050505b806001908051906020019061003f929190610047565b505b506100bf565b828054828255906000526020600020908101928215610089579160200282015b82811115610088578251829060001916905591602001919060010190610067565b5b509050610096919061009a565b5090565b6100bc91905b808211156100b85760008160009055506001016100a0565b5090565b90565b61030a806100ce6000396000f30060606040526000357c0100000000000000000000000000000000000000000000000000000000900463ffffffff1680632f265cf714610067578063392e6678146100a55780637021939f146100e1578063b13c744b1461011f578063cc9ab2671461015b575bfe5b341561006f57fe5b61008960048080356000191690602001909190505061017f565b604051808260ff1660ff16815260200191505060405180910390f35b34156100ad57fe5b6100c76004808035600019169060200190919050506101cd565b604051808215151515815260200191505060405180910390f35b34156100e957fe5b610103600480803560001916906020019091905050610233565b604051808260ff1660ff16815260200191505060405180910390f35b341561012757fe5b61013d6004808035906020019091905050610253565b60405180826000191660001916815260200191505060405180910390f35b341561016357fe5b61017d600480803560001916906020019091905050610278565b005b60006000151561018e836101cd565b1515141561019c5760006000fd5b60006000836000191660001916815260200190815260200160002060009054906101000a900460ff1690505b919050565b60006000600090505b6001805490508110156102285782600019166001828154811015156101f757fe5b906000526020600020900160005b505460001916141561021a576001915061022d565b5b80806001019150506101d6565b600091505b50919050565b60006020528060005260406000206000915054906101000a900460ff1681565b60018181548110151561026257fe5b906000526020600020900160005b915090505481565b60001515610285826101cd565b151514156102935760006000fd5b600160006000836000191660001916815260200190815260200160002060008282829054906101000a900460ff160192506101000a81548160ff021916908360ff1602179055505b505600a165627a7a72305820994b2ebbfeec46890216bc547cf9a1292547cc43f08440506866c34b2ff0ac9e0029'

Steps


Step 1: Install node.js and web3 on both nodes

The interaction to contract is through nodejs and web3js. We need to install nodejs and the web3 modules. I follow the procedure suggested here (link).
Node 1
$ sudo apt-get install python-software-properties
$ curl -sL https://deb.nodesource.com/setup_6.x | sudo -E bash -
$ sudo apt-get install nodejs

To verify successful installation, use $ node -v and $ npm -v, and their version is shown.
Then install web3 module.

Node 1
$ npm install web3

Repeat this step in Node 2 as well.

Step 2: Access Blockchain through web3 in Node Console


We are ready to access the node. Since we need both geth client and node console, we will use split screen again. The top terminal is geth, and the bottom is node console.

To start the geth, depending on whether you still have geth running, either command should bring you back to console.

Node 1 (geth)
$ geth --nodiscover console 2>>eth.log OR
$ geth attach

To start the node console, simply use this

Node 1 (node)
$ node

Two-Node Setup of a Private Ethereum on AWS with Contract Deployment (Part 2)

We are now ready to use node console to access geth by rpc. The default rpc is on http://localhost:8545/.
First, turn on rpc on geth:

Node 1 (geth)
> admin.startRPC()

On node console,

Node 1 (geth)
> admin.startRPC()

To verify if the node can reach geth successfully we can use > web3.eth.accounts on node console. We should see the account that we created on geth console.

Two-Node Setup of a Private Ethereum on AWS with Contract Deployment (Part 2)

Repeat this step on Node 2.

Step 3: Deploy Contract on Node 1


We now deploy the contract on this private blockchain from Node 1.

Node 1 (node)
> abi = <abi shown above>
> VotingContract = web3.eth.contract(JSON.parse(abi))
> byteCode = <bytecode shown above>

As the deployment requires gas, we need to unlock the account and turn on mining

Node 1 (geth)
> personal.unlockAccount(eth.accounts[0])
> miner.start()

Now we deploy the contract. This contract requires a list of candidates. We will include this when deploying the contract.

Node 1 (node)
> deployedContract = VotingContract.new(['Rama', 'Nick', 'Jose'], { data: byteCode, from: web3.eth.accounts[0], gas: 4700000 })

Now the contract is deployed. And we can execute the functions for verification. We will see the vote increasing when we keep executing the functions.

Node 1 (node)
> deployedContract.totalVoteFor.call('Rama')
> deployedContract.voteForCandidate('Rama', {from: web3.eth.accounts[0]})

Two-Node Setup of a Private Ethereum on AWS with Contract Deployment (Part 2)


The contract is successfully deployed. Now we move to Node 2 and see how account in Node 2 can also access this contract.

Step 4: Access Contract from Node 2


Make sure Node 1 and Node 2 have already peered. Verify by > admin.peers on geth console on both nodes. Refer to Part 1 how to do if needed.

The information required for an account in Node 2 accessing this deployed contract is (1) the ABI and (2) its deployed address. We have ABI information already. Now from Node 1 we can obtain this deployed address.

Node 1 (node)
> deployedContract.address
'0x97a4b975c8fde24d8e40551054342c95676ed959'
0]})

For ABI, we define VotingContract with the same abi on Node 2.

Node 2 (node)
> abi = <abi shown above>
> VotingContract = web3.eth.contract(JSON.parse(abi))

We do not need to deploy a new contract as we did on Node 1. Instead, we define the contract instance based on the VotingContract and the address we obtained from Node 1.

Node 2 (node)
> contractInstance = VotingContract.at('0x97a4b975c8fde24d8e40551054342c95676ed959')

Left-hand-side is Node 1, and right-hand-side is Node 2.

Two-Node Setup of a Private Ethereum on AWS with Contract Deployment (Part 2)
Now, contract Instance is the point we can access this deployed contract in Node 2. We can issue the commands just as we do on Node 1:

Node 2 (node)
> contractInstance.totalVoteFor.call('Rama')
> contractInstance.voteForCandidate('Rama', {from: web3.eth.accounts[0]})
)

Don’t forget to unlock the account on Node 2 when voting, as this consumes gas to execute a function on the contract.

Step 5: Verification


By interacting on both nodes, we see accounts on both nodes are acting on the same contract. Here I capture the interaction between the two nodes.

  1. Both nodes see the same result (vote count for Rama is 4).
  2. An account on Node 1 votes for Rama once.
  3. From Node 2 we see the vote count for Rama is now 5.
  4. An account on Node 2 votes for Rama again.
  5. From Node 1 now we see the vote count is now 6.

Closing


This setup emulates the real Ethereum operation. New nodes can easily join the public chain and can access deployed contract. Of course, in real life, the application is most likely accessed through web interface. Nevertheless, using console helps understanding more the interaction behind.

Once again, thanks for many works by others which inspire and guide my overall setup. Here they are,

  • JJ’s World: Setting up a private Ethereum blockchain (link)
  • Mahesh Murthy: Ethereum for Web Developers (link)
  • MLG Blockchain Consulting: Use Go-Ethereum to Setup an Ethereum Blockchain on AWS (link)